🔬 Welcome to OpenLabs!
warning
This is a new project and does not have a stable release yet!
OpenLabs is an open-source platform for rapidly designing and deploying complex lab environments on any cloud.
Go from a simple blueprint to a fully deployed lab environment in minutes. Building on Terraform and Ansible, OpenLabs empowers you to define an entire environment in YAML and deploy consistent, on-demand sandboxes for development, testing, or cybersecurity training.
🚀 Getting Started
Ready to dive in? Our Quick Start guide will get your first lab running in minutes.
✨ Features
- Blueprints: Design anything from a single VM to complex, multi-VPC network topologies in one simple YAML file.
- Automation: Deploy and destroy entire cloud environments with a single click, managing all resources from creation to cleanup.
- Cloud Agnostic: Define your lab once and deploy it to any supported provider, starting with AWS and Azure.
- Centralized Control: Manage all active labs, monitor deployment jobs in real-time, and access connection details from a single dashboard.
- Extensible API & CLI: Integrate OpenLabs into your existing workflows and build custom tooling with a full-featured REST API and command-line interface.
🤝 Acknowledgments
- Core Developers: A huge thanks to the core development team: @adamkadaban, @alexchristy, and @nareshp1.
- Inspiration: This project took much inspiration from the fantastic Ludus project by Bad Sector Labs.
- Built On Open Source: OpenLabs stands on the shoulders of giants, using countless open-source libraries and Ansible roles from the community.
🚀 Tutorials
In this section there are tutorials to:
- Deploy your first lab in under 5 minutes
🚀 Deploy Your First Range
This guide will walk you through creating and deploying a simple lab environment in under 5 minutes.
What you'll learn:
- How to add your cloud provider credentials to OpenLabs.
- How to create a Blueprint using a JSON template.
- How to deploy a Blueprint into a live Range.
- How to view and delete your deployed Range.
important
Prerequisites Before you begin, ensure you have:
- Completed the Installation Guide so OpenLabs is running.
- Your cloud provider credentials (e.g., AWS Access Key & Secret Key) ready.
🔑 Step 1: Add Credentials
First, let's connect your cloud provider account to OpenLabs.
-
Navigate to http://localhost:3000 or to your OpenLabs instance and create your account.
-
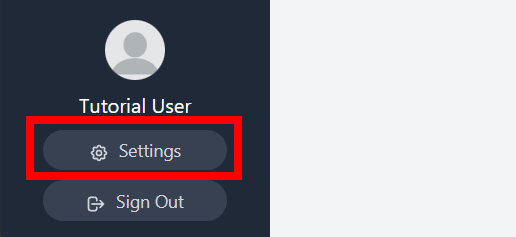
Once logged in, click the Settings icon in the bottom-left corner.
-
Scroll down to the Cloud Credentials section and enter your provider's keys. A successful connection will be marked with a green
Configuredstatus.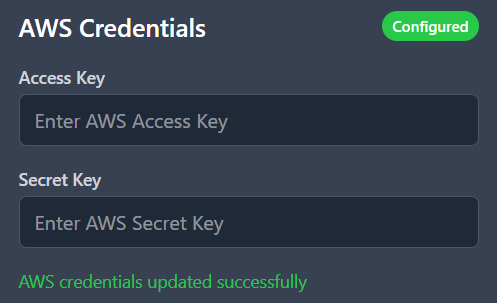
📘 Step 2: Create a Blueprint
Next, you'll define the structure of your lab using a Blueprint.
-
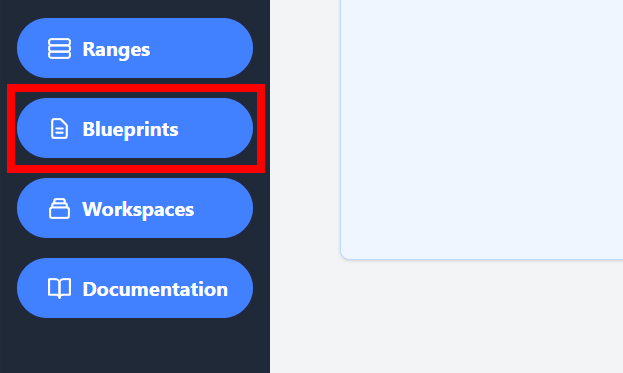
Navigate to the Blueprints dashboard from the main menu.
-
Click the Create Blueprint button.
-
While OpenLabs offers a visual builder, this guide uses the JSON editor for speed. Select the Advanced Mode tab.

-
Click Load Example in the top-right corner to populate the editor with a sample configuration.

-
Click Skip to Review to see a summary and an interactive network diagram of the blueprint.
-
Finally, click Create Blueprint to save it.
🚀 Step 3: Deploy the Blueprint
Now, let's deploy the blueprint to create a live Range.
-
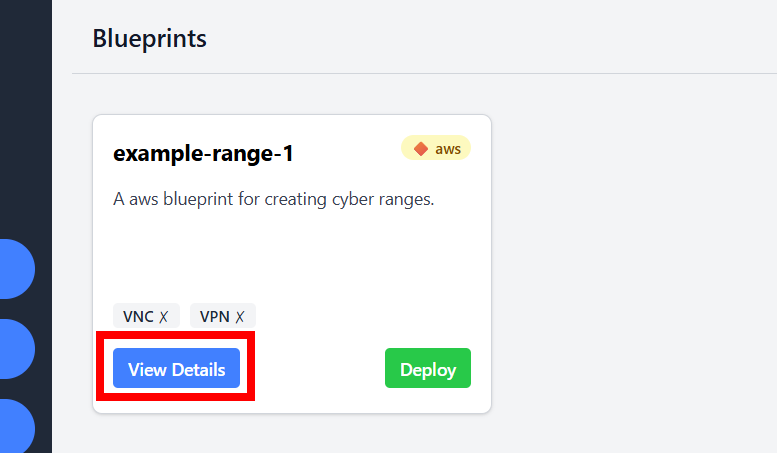
After creating your blueprint, you'll be on the Blueprints dashboard. Find your new blueprint and click View Details.
-
On the details page, review the summary and click Deploy Blueprint.
-
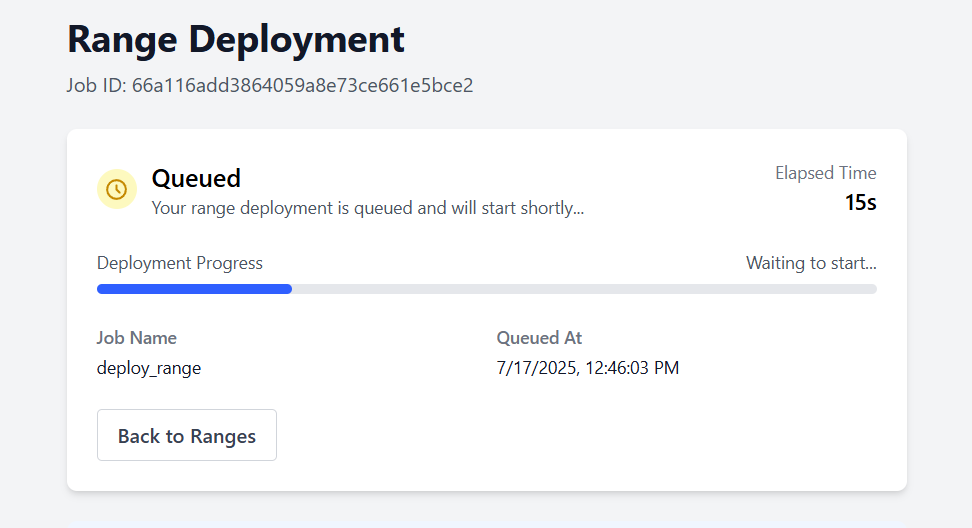
You'll be redirected to the deployment status page. The process takes about 3 minutes. The deployment runs in the background, so you can navigate to other parts of the app while you wait.
-
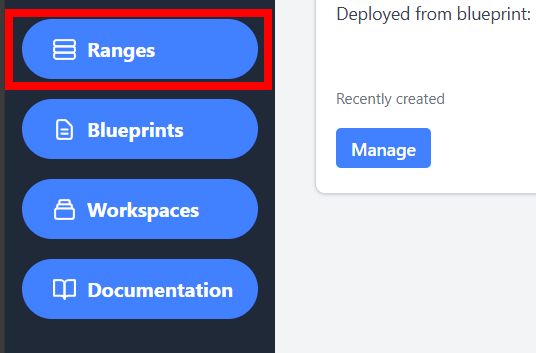
Once complete, navigate to the Ranges dashboard.
-
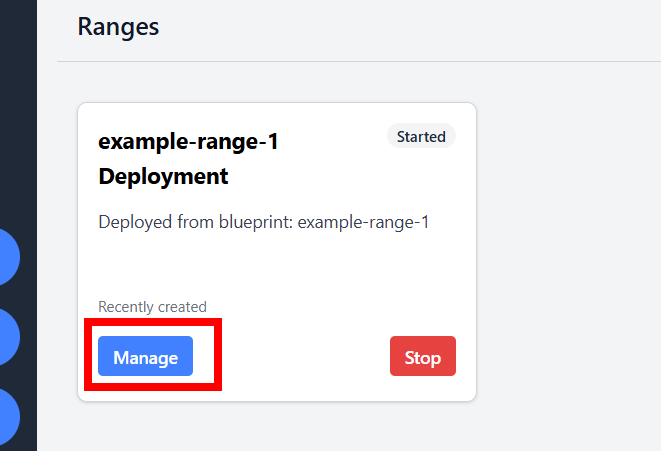
Click Manage on your new range to view its details, including host information and connection details.
🎉 Success
Congratulations on deploying your first Range. Feel free to explore the different features for managing and accessing it. Once you are finished, you can destroy the range by clicking the Delete Range button.
You can continue learning about OpenLabs by looking through our Explanation Section.
🚀 Starting with the CLI
🛠️ How-To Guides
In this section you can find guides on how to:
- Install OpenLabs locally
- Configure your own OpenLabs instance
🛠️ Installation
This guide will get OpenLabs running on your local machine using Docker.
important
You must have Git and Docker Desktop (or Docker with Compose) installed.
📦 Step 1: Clone the Repository
Open your terminal and run the following command to clone the repository onto your machine.
git clone https://github.com/OpenLabsHQ/OpenLabs
🛠️ Step 2: Configure the App
Navigate into the new directory. OpenLabs requires a .env file for configuration.
cd OpenLabs/
cp .env.example .env

# Set credentials
nano .env
🚀 Step 3: Launch OpenLabs
Run Docker Compose to build and start all the OpenLabs services.
docker compose --profile frontend up -d
note
The first launch may take several minutes to download the required images. Subsequent launches will be significantly faster.
✅ Step 4: Verify Your Installation
Visit: http://localhost:3000. You should see the OpenLabs homepage.
🎉 Success
Congratulations, OpenLabs is now running!
Now you're ready to deploy your first lab. Head back to the Deploy Your First Range to continue.
🧠 Explanation
In this section you will learn about:
- The core components of OpenLabs
- The lab object hierarchy
🧠 Core Components
At its heart, the OpenLabs lifecycle is simple: you define a Blueprint, deploy it to create a live Range, and can later save that Range as a Snapshot.
-
🏗️ Blueprint: The YAML/JSON file that acts as a recipe for your lab. It defines every part of your environment: VPCs, subnets, hosts, and their configurations. A Blueprint doesn't represent any live cloud resources and doesn't cost anything.
-
☁️ Range: The live, running version of a Blueprint. When you deploy a Blueprint, OpenLabs creates a Range, which consists of all the actual cloud resources (VMs, networks, etc.). This is the environment you interact with, and it is what incurs costs from your cloud provider.
-
📸 Snapshot: A point-in-time backup of a Range. It saves the state of all hosts and the network configuration. You can use a Snapshot to restore a lab to a previous state or to deploy new, identical clones of the snapshotted range.
Below is a visualization of how these relate to each other:

🧠 Lab Hierarchy
Every lab you build follows a logical network hierarchy. This structure helps you organize even the most complex environments.
-
Range: The top-level container for your entire deployed lab.
-
VPC: (Virtual Private Cloud) An isolated network within your Range. A Range can have multiple VPCs.
-
Subnet: A subdivision of a VPC's IP address range where hosts live.
-
Host: An individual virtual machine (VM) running within a Subnet.
Below is a visualization of how these objects relate to one another:

📚 Reference
In this section you can find OpenLabs technical reference materials including:
- Architecture diagrams
📚 Architecture Diagram

🗺️ Roadmap
Our vision for OpenLabs is ambitious. The table below outlines the major outcomes we are focused on delivering. This is a living document that will evolve based on project needs and community feedback.
Status: Shows the current stage of a feature.
🧪 Exploring: We are researching and designing the feature.🗓️ Planned: The feature is designed and is in our near-term backlog.🏗️ In Progress: The feature is in active development.
Timeline: Provides a general estimate. As an open-source project, these are targets, not promises.
| Feature/Outcome | Description | Status | Estimated Timeline |
|---|---|---|---|
| Live Environment Management | Dynamically add/remove hosts, power them on/off, and manage firewall rules in a deployed Range without a full redeploy. | 🏗️ In Progress | Q3 2025 |
| Lab Snapshots & Cloning | Save the complete state of a running host or an entire Range. Deploy perfect, pre-configured clones from a snapshot. | 🗓️ Planned | Q3 2025 |
| Automated Range Cleanup | Set expiration timers to automatically shut down or destroy deployed Ranges, helping reduce cloud costs. | 🗓️ Planned | Q3 2025 |
| Azure Cloud Provider | Define your lab once and deploy it to Microsoft Azure, in addition to our existing AWS support. | 🗓️ Planned | Q3 2025 |
| Workspaces for Teams | Create shared workspaces for teams to collaborate on Blueprints and manage deployed Ranges with role-based permissions. | 🧪 Exploring | Q3 2025 |
| Custom & Pre-Built Images | Use Packer integration to build your own "golden images" or use official pre-built ones. | 🧪 Exploring | Q4 2025 |
| Integrated Remote Access | Securely connect to your lab hosts via an auto-configured VPN and in-browser terminal/VNC access (via Apache Guacamole). | 🧪 Exploring | Q4 2025 |
| Automated Host Configuration | Attach Ansible playbooks or roles to your Blueprints to automatically provision software on your hosts after they are deployed. | 🧪 Exploring | Q4 2025 - Q1 2026 |
Have an idea or want to provide feedback on our direction? We'd love to hear from you! Please start a discussion on GitHub.